Query
Introduction
Queries are used in Datastorms to select instance data. For instance, you might use one to populate a table on a page or to generate a report in the reporting editor. Creating a query in Datastorms is made easy with our specially developed no-code methodology.
Basics
Each query is composed of two main elements:
- The root schema, which serves as the starting point for the query.
- The query's content itself.
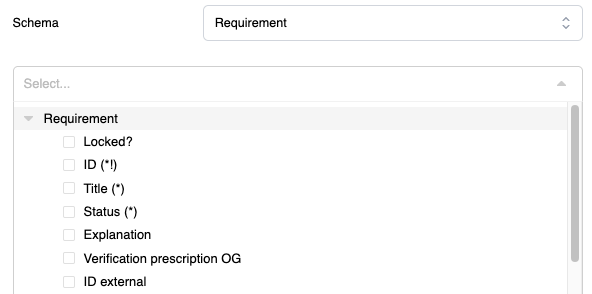
Root schema selection
Any scheme can be selected as a root scheme for a query. The root-scheme is where the query starts gathering instance data.
Content selection
A dropdown-list will become available with in the root the selected root-scheme. Select the required properties of the root-scheme.
When properties of related scheme's are required, click on the arrow in front of the relation-name.
In Tree's it is possible to also select recursive relations. In this case only the recursive relation needs to be selected. The properties of the top-scheme will be used for all child (or parent if selected this relation) instances.
Property Indicators (* and !)
When selecting properties in the dropdown-list, you might see special characters next to some property names. These indicators help you understand the constraints of the data you are querying:
- Asterisk (
*): Indicates that the property is Required. This means every instance of this schema will always have a value for this property, and it cannot be empty. - Exclamation mark (
!): Indicates that the property is Unique. This means that the value of this property must be distinct across all instances in the schema.
Properties can also have both indicators (*!), meaning the field is both mandatory and unique.
Filtering
Default all instance data is queried. You can define filters in the filtering section to display only a subset of the data in your query results. To add a simple filter, click the green "+"-button in the filtering section. A new filter will then appear, which you can configure as desired.
Single Filter
- First choose the property you want to apply the filter to, such as a person's "Name."
- Next set the comparison method for the filter. This depends on the property's ValueType. For a String (text), options include:
- Contains
- Starts with
- Ends with
- Equals
- Then define the value compare to.
An example of a string filter can be: "Only show Persons with Name Equals Jan-Willem."
When clicking on the dropdown next to the filter some additional options become available:
- Negate filter: if the filter represents a negation, set the Negate filter toggle to true. For example, this could be a statement like: "All names except 'Jan-Willem'.".
- User setable filter: This indicates whether the value set in step 4 can be changed by the end-user (e.g. for a table or report). The value entered in step 3 then becomes the default.
- Label: you can name the filter for the end-user's input value.
Multiple Filters
It's possible to have more than one filter in a query by clicking the green "+" button again. Now you'll need to make some configuration choices:
- Are the filter results complimentory (OR) or restrictive (AND)?
- Are more complex grouping of filters required for the desired logic?